

Supply and Demand Zones Trading: The Ultimate Guide for Forex Traders
Introduction
Every serious forex trader wants an edge. Supply and demand zones trading gives you exactly that.
This strategy is not based on guesswork. It is based on institutional order flow the same logic that banks and hedge funds use. When you master it, you start reading the market like a professional.
In this guide, you will learn what supply and demand zones are, how to draw supply and demand zones correctly, and how demand zone trading can improve your entries and exits dramatically.
Let’s dive in.
What Are Supply and Demand Zones?
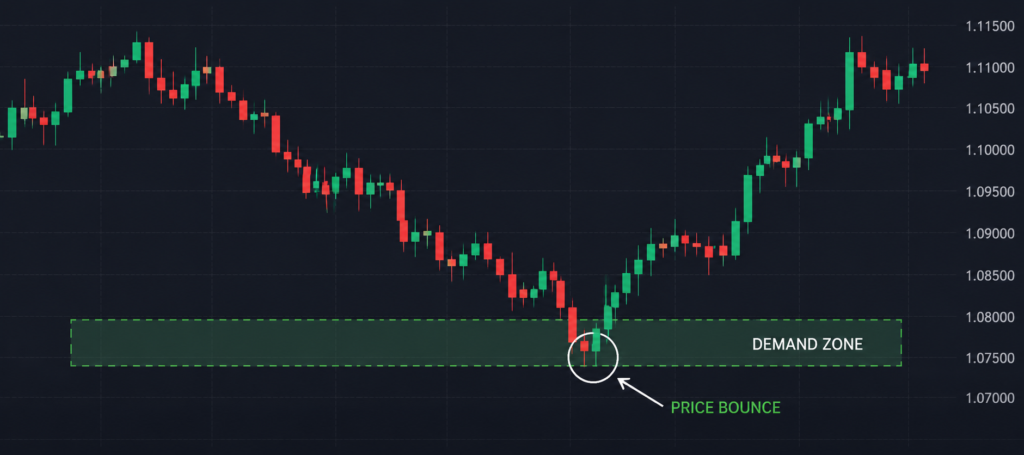
Supply and demand zones are price areas where strong buying or selling activity has previously occurred. These areas act like magnets. Price tends to return to them and then react sharply.
Think of it this way:
- A demand zone is a price level where buyers were aggressive. Price left this area quickly and moved higher.
- A supply zone is a price level where sellers took control. Price dropped fast from this area.
These zones represent unfilled institutional orders. When price revisits them, those orders get triggered again creating high-probability trade setups.
Why Supply and Demand Zones Trading Works
Most retail traders use lagging indicators. Supply and demand zones trading uses raw price behavior instead.
Here is why this method has an edge:
- It reflects real market activity: not just a formula applied to price.
- It works on all timeframes: from 1-minute scalping to weekly swing trading.
- It aligns with institutional logic:
- big players leave footprints in the chart.
- It combines well with price action: rejection candles and engulfing patterns confirm zone strength.
When you trade with this approach, you stop fighting the market and start following the money.
How to Draw Supply and Demand Zones: Step by Step
Knowing how to draw supply and demand zones is the most important skill in this strategy. Many traders mark them incorrectly and then wonder why price doesn’t react.
Follow these steps:
Step 1: Find a Strong Move Look for a sharp, fast-moving candle (or group of candles). This move shows that big orders were placed.
Step 2: Identify the Base The base is the consolidation area just before the strong move. This is your actual zone. Mark the top and bottom of this base.
Step 3: Draw the Zone as a Rectangle Use a rectangle tool on your trading platform. Extend it forward into future price action. This shows you where price might react when it returns.
Step 4: Confirm It Is Fresh A zone is “fresh” when price has not revisited it yet. Fresh zones are stronger. Zones that have been touched multiple times lose their effectiveness.
Step 5: Wait for Price to Return Do not enter the moment you draw the zone. Wait for price to come back to it. Then look for confirmation like a rejection candle or engulfing pattern.
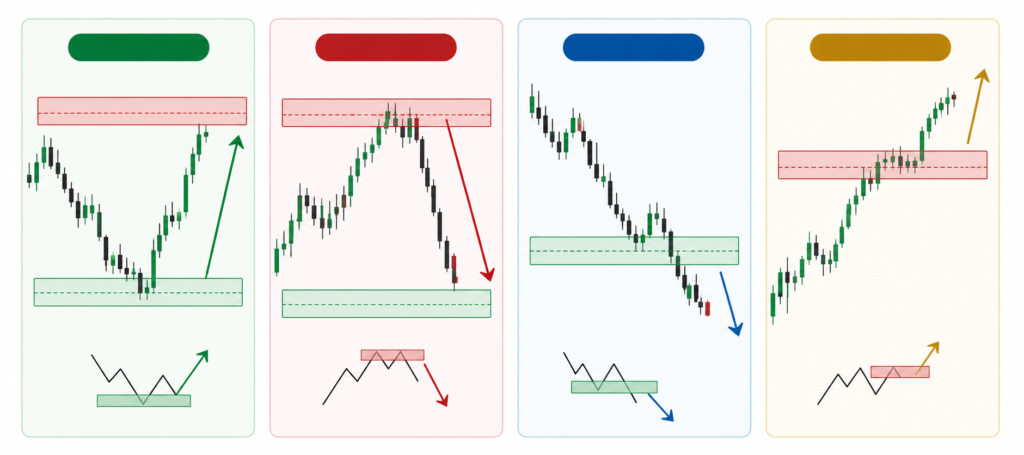
Types of Supply and Demand Zones
Zone Type | What Happens | Trade Direction |
Rally-Base-Rally (RBR) | Price rallies, consolidates, rallies again | Buy at base |
Drop-Base-Drop (DBD) | Price drops, consolidates, drops again | Sell at base |
Rally-Base-Drop (RBD) | Price rallies, consolidates, then drops | Sell at base |
Drop-Base-Rally (DBR) | Price drops, consolidates, then rallies | Buy at base |
The DBR and RBD patterns are the most powerful. They represent complete reversals and typically offer the highest reward-to-risk ratios.
Demand Zone Trading: Entry and Exit Strategy
Demand zone trading is straightforward when you have a clear process.
Entry Rules:
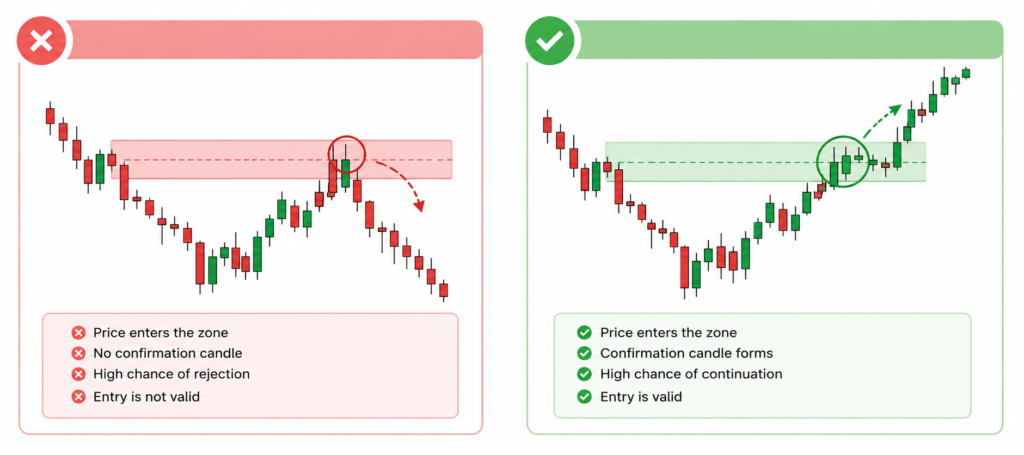
- Wait for price to enter the demand zone
- Look for a confirmation candle pin bar, engulfing, or inside bar
- Enter on the close of the confirmation candle or on a retest
Stop Loss Placement:
- Place your stop loss a few pips below the bottom of the demand zone
- This protects you if the zone fails
Take Profit Targets:
- Target the nearest supply zone above
- Use a minimum 1:2 risk-to-reward ratio
- Consider partial exit at 1:1 to secure profit
Pro Tip: Zones that form on higher timeframes (H4, Daily, Weekly) are significantly stronger than lower timeframe zones. Always check the bigger picture before entering.
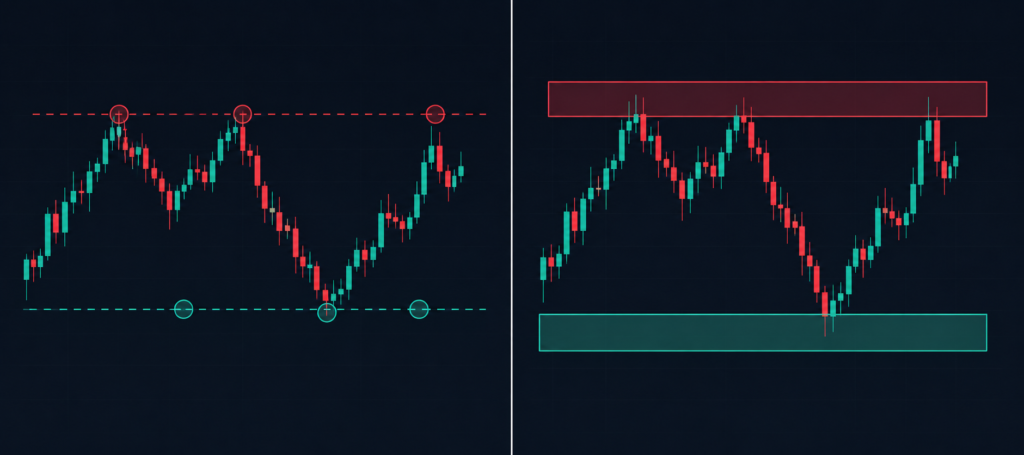
Supply and Demand Zones vs Support and Resistance
Many traders confuse these two concepts. Here is the key difference:
Feature | Support & Resistance | Supply & Demand Zones |
Shape | Line | Rectangle (zone) |
Based on | Multiple touches | Strong price moves |
Logic | Technical levels | Institutional orders |
Effectiveness | Weakens with touches | Strongest when fresh |
Supply and demand zones are more precise and more aligned with how professional traders think. They give you an area to work within not just a single price line to watch.
Common Mistakes to Avoid
Avoid these errors when applying supply and demand zones trading:
- Marking old, overused zones: Fresh zones react better. Discard zones that price has visited more than twice.
- Entering without confirmation: Never enter just because price touched a zone. Wait for a reaction candle.
- Ignoring higher timeframes: A zone on a 15-minute chart inside a supply zone on the daily chart is a losing trade.
- Using too tight a stop loss: Give the zone room to breathe. Price often spikes briefly into a zone before reversing.
- Trading every zone you see : Be selective. Only trade the cleanest, most obvious zones.
FAQs: Supply and Demand Zones Trading
What timeframe is best for supply and demand zones trading?
How do I know if a supply or demand zone is still valid?
Can I use supply and demand zones with other strategies?
How is demand zone trading different from support level trading?
Do supply and demand zones work in cryptocurrency and stocks?
Final Thoughts / Conclusion
Supply and demand zones trading is one of the most powerful approaches available to retail traders today. It cuts through the noise and focuses on what actually moves price institutional orders.
Once you understand how to draw supply and demand zones correctly and practice demand zone trading with proper entries and risk management, your chart reading will transform entirely.
Stop chasing trades. Start waiting for price to come to your levels.
The market rewards patience. Supply and demand zones give you the framework to be patient and profitable.
Visit ForexMarketTrendss.com for more advanced forex strategies, tools, and market analysis updated daily.